


# DHCP SERVER SETTINGS
If WDS and DHCP Server are NOT on same machine, Use the following Setting to inform client from which server to boot.
# TFTP ERROR:
After configuring WDS, you may get following error while trying to boot from Network. .
.Solution : You have to configure boot ROM in WDS console to tell Client which boot ROM file to use.
>

Note: startrom.com & pxeboot.com Boot ROM files can found at this location
\\WDS_SERVER\RemoteInstall\Boot\x86# startrom.com is suitable if you have only legacy images on your WDS Server.
# pxeboot.com is suitable if you have both legacy WinXP/ERD/Acronis and Windows 7 images configured on your WDS Server.
TIP: You can also use startrom.n12 & pxeboot.n12 If you want to directly boot to WDS skipping F12.
Howto Add Drivers in XP Image (Legacy)
First create following folder structure\$OEM$\$1\Driversin your Windows XP RIS image location e.g:
\\wds_server\RemoteInstall\Setup\English\Images\WINDOWS-XP-SP3\i386\$OEM$\$1\Drivers\
Copy your network card driver here. (in drivers folder)
Now open unattended file like winnt.sif or ristndrd.sif in notepad
(Depend on your deployment structure)
e.g:
WDS_SERVER\RemoteInstall\Setup\English\Images\WINDOWS-XP-SP3\i386\templates\Add following lines in [Unattended] section
[Unattended]Make sure there are no duplications.
DriverSigningPolicy=Ignore
OemPreinstall=yes
OemPnpDriversPath=Drivers\Nic
Restart WDS Service.
Adding ERD COMMANDER 2007 in WDS
Simply Add Windows 2003 Standard Edition from WDS Legacy Console,Now Copy I386 folder from ERD folder to WDS windows 2003 image folder. If it asks for Overwrite , Select Yes.
Now add the /minint synatx in this file
\\wds_server\RemoteInstall\Setup\English\Images\ERD\i386\templates\ristndrd.sif
[SetupData]To add driver in ERD Commander, copy your network driver in
OsLoadOptions = “/noguiboot /fastdetect /minint”
(I don’t know the exact path, so copy it in all possible folder, some1 please point which exactly should these files be pasted in, i guess only system32 is enough)
\\wds_Server\RemoteInstall\Setup\English\Images\ERD\i386
\\wds_Server\RemoteInstall\Setup\English\Images\ERD\i386\system32
\\wds_Server\RemoteInstall\Setup\English\Images\ERD\i386\system32\drivers
Add Win7 Boot Image:
Following is an excellent guide on howto add Windows 7 Boot Image in WDShttp://www.windows-noob.com/forums/index.php?/topic/261-how-can-i-capture-an-image-using-wds/
Add Drivers in Windows 7 Boot Image:
First copy boot.wim from windows 7 CD to your desktop.Now we have to mount this image in any temporarily directory,
Then add drivers, then commit change,
Now dismount this image,
Now copy it to any folder in WDS server,
From wds console, replace current boot image with this new image. The traditional way is to use the DISM tool provided with your win7/vista, but the easiest way to do is to use 3rd party GUI tool (Free edition).
Download DISM GUI tool from
Mr Jinje DISM Tool™
http://www.msfn.org/board/topic/138804-mr-jinje-dism-tool/
Now first copy the boot.wim from the wds server or from the windows 7 dvd from \sources\ folder.
Now open the Jinje DISM Tool, Click on MOUNT WIM, select boot.wim , and mount it in any temp folder, e.g: c:\wds_temp_mount_dir
Now Click ADD DRIVERS, point it to folder where your windows 7 drivers are located. It will auto add it to boot.wim.
Now Click on COMMIT WIM, it will write changes to this boot.wim
Now click on DIS-MOUNT WIM.
Copy this updated boot.wim to wds temporarily directory.
From WDS Console, replace current boot image with your newly updated image you copied in temp folder of wds.

.
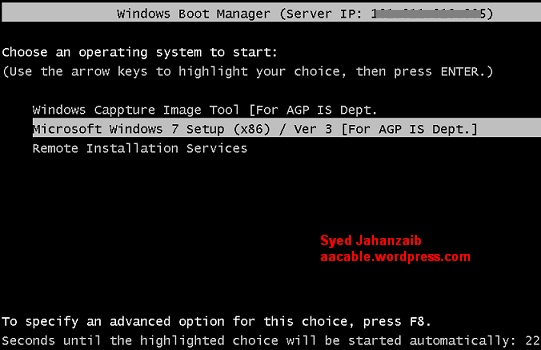
Final ~ Screenshots  <WDS running in Mixed Mode>
 .
.


