IP v6 Connecting Tomorrow's Internet Today

An Internet Protocol Version 6 address (IPv6 address) is a numerical label that is used to identify a network interface of a computer or other network

This is default featured slide 2 title

Go to Blogger edit html and find these sentences.Now replace these sentences with your own descriptions.This theme is Bloggerized by Lasantha Bandara - Premiumbloggertemplates.com.

Team Work...

"a joint action by a group of people, in which each person subordinates his or her individual interests and opinions to the unity and efficiency of the group."

This is default featured slide 4 title

Go to Blogger edit html and find these sentences.Now replace these sentences with your own descriptions.This theme is Bloggerized by Lasantha Bandara - Premiumbloggertemplates.com.

System fail situation in network server room

A system failure can occur because of a hardware failure or a severe software issue. Commonly, a system failure will cause the system to freeze, reboot, or stop functioning altogether.

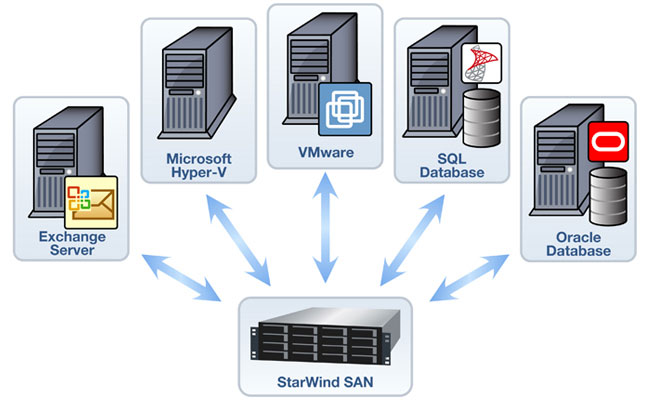
Optimizing Servers, Data and Storagewith End-User Provision

A new server and storage system can keep your businesses current with technology and best practices, reduces cost, provide quickly Return On Investment on your business and help end users become more productive and collaborate

Configure FTP Over SSL : FTP Server

Introduction

Microsoft has created a new FTP service that has been completely rewritten for Windows Server® 2008. This FTP service incorporates many new features that enable web authors to publish content better than before, and offers web administrators more security and deployment options.

One of the features is FTP over Secure Sockets Layer (SSL), which allows sessions to be encrypted between an FTP client and server. This document walks you through: setting up an FTP site; and, configuring that site to use SSL with the new FTP user interface, which allows you to directly edit the IIS 7.0 configuration files. It contains

Prerequisites

The following items are required to be installed to complete the procedures in this article:

  1. IIS 7.0 must be installed on your Windows 2008 Server, and the Internet Information Services Manager must be installed.
  2. The new FTP service. You can download and install the FTP service from the http://www.iis.net/ web site using one of the following links:
  3. You will need to create a root folder for FTP publishing:
    • Create a folder at "%SystemDrive%\inetpub\ftproot"
    • Set the permissions to allow access for the administrators group:
      • Open a command prompt.
      • Type the following command:
        ICACLS "%SystemDrive%\inetpub\ftproot" /Grant administrators:F /T
      • Close the command prompt.
Note: The settings listed in this walkthrough specify "%SystemDrive%\inetpub\ftproot" as the path to your FTP site. You are not required to use this path; however, if you change the location for your site you must change the site-related paths that are used throughout this walkthrough.

Creating a Self-signed SSL Certificate

In this optional task you will create a self-signed SSL certificate that you will use for testing your FTP site.


  1. Open the Internet Information Services (IIS 7.0) Manager.
  2. Click your computer at the top node of the Connections tree, then double-click the Server Certificates feature.
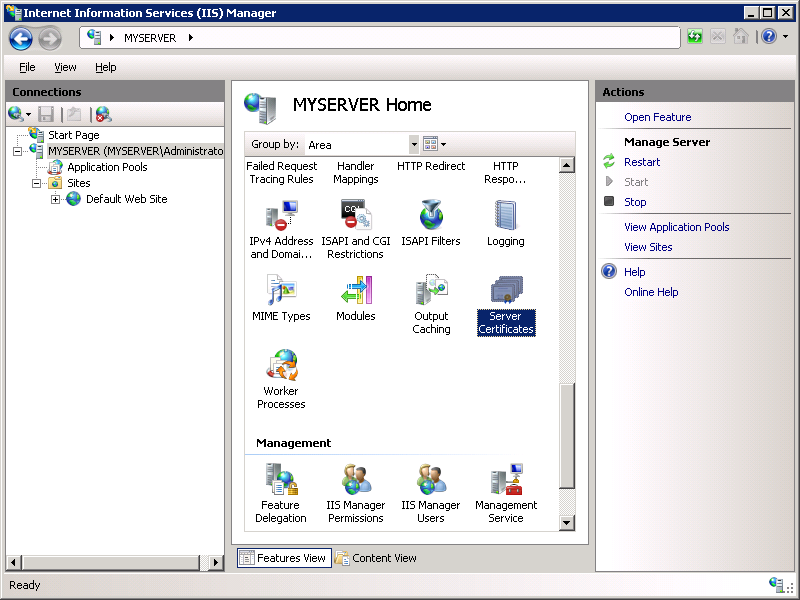
  3. Click Create Self-Signed Certificate in the Actions pane.
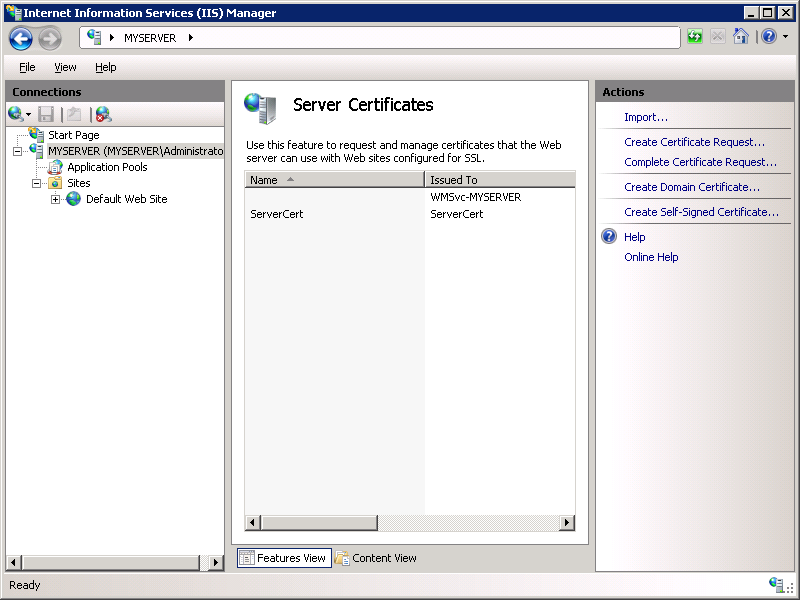
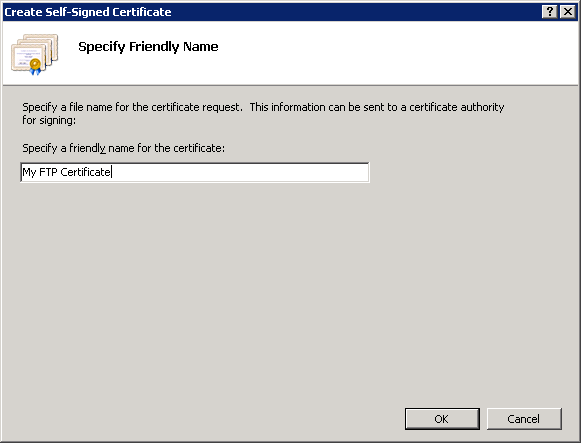
  4. Enter "My FTP Certificate" as the name for the new certificate, then click OK.
Creating an SSL-enabled FTP Site Using the IIS 7.0 Manager


Step 1: Use the FTP Site Wizard to Create an SSL-based FTP Site


In this first step, you create a new FTP site that can only be opened using your administrator account.

  1. Go to IIS 7.0 Manager. In the Connections pane, click the Sites node in the tree.
  2. Right-click the Sites node in the tree and click Add FTP Site, or click Add FTP Site in the Actions pane.
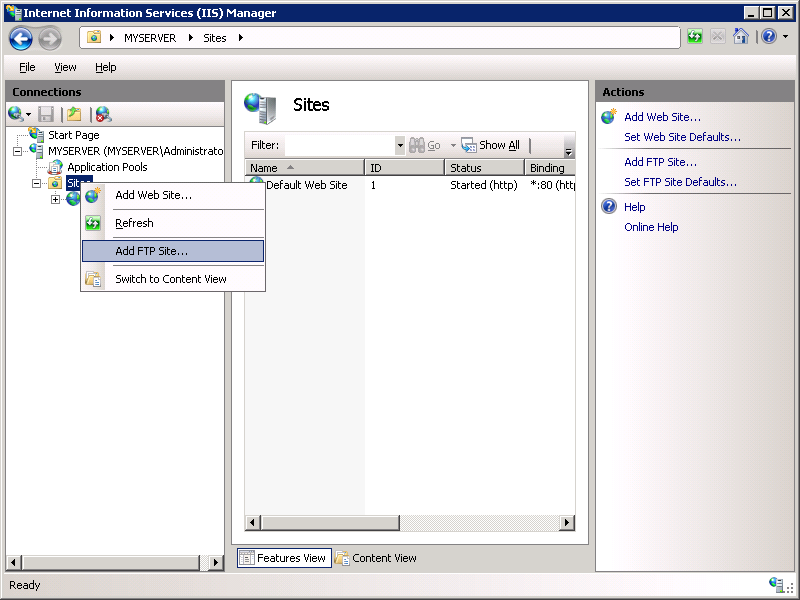
  3. When the Add FTP Site wizard appears:
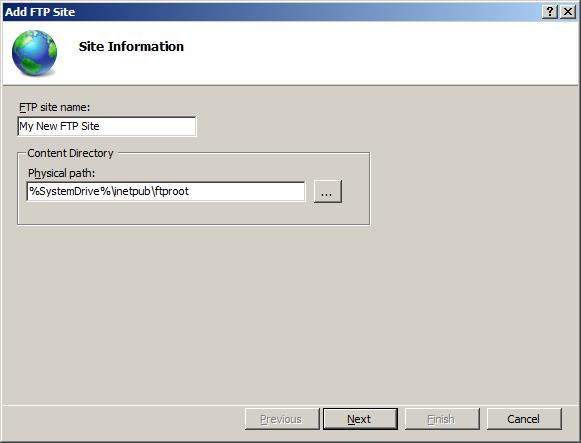
    • Enter "My New FTP Site" in the FTP site name box, then navigate to the "%SystemDrive%\inetpub\ftproot" folder that you created in the Prerequisites section. Note: If you choose to type in the path to your content folder, you can use environment variables in your paths.
    • Click Next.
  4. On the next page of the wizard:
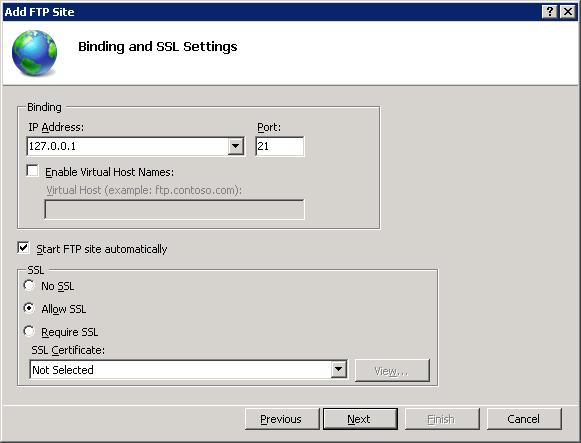
    • Choose an IP address for your FTP site from the IP Address drop-down, or choose to accept the default selection of "All Unassigned." Because you will use the administrator account later in this walk-through, make sure that you restrict access to the server and enter the local loopback IP address for your computer by typing "127.0.0.1" in the IP Address box.
    • You would normally enter the TCP/IP port for the FTP site in the Port box. For this walk-through, choose to accept the default port of 21.
    • For this walk- through, you do not use a host name, so make sure that the Virtual Host box is blank.
    • Make sure that the Certificates drop-down is set to your SSL certificate. For example, if you followed the optional step to create a self-signed certificate, the drop-down box should say "My FTP Certificate".
    • Make sure that the Allow SSL option is selected.
    • Click Next.
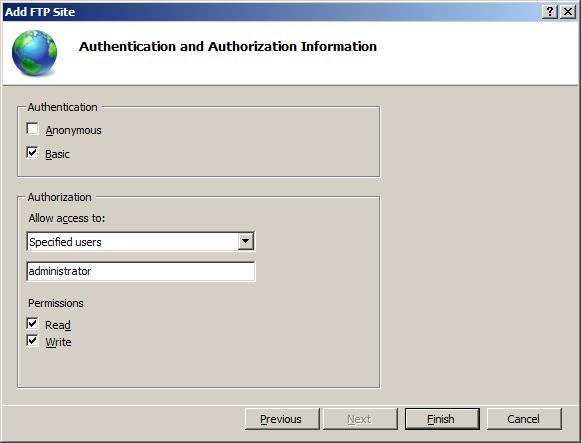
  5. On the next page of the wizard:
    • Select Basic for the Authentication settings.
    • For the Authorization settings:
      • Choose "Specified users" from the Allow access to drop-down.
      • Type "administrator" for the user name.
      • Select Read and Write for the Permissions option.
    • When you have completed these items, click Finish.
Summary


You have successfully created a new SSL-based FTP site using the new FTP service.

Step 2: Configuring Additional FTP SSL Settings


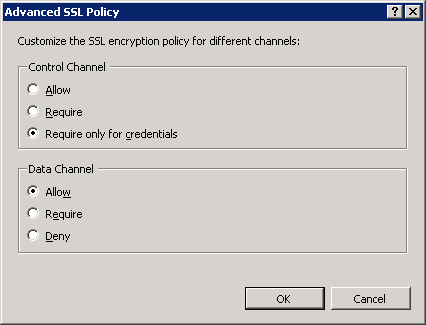
The SSL policy for FTP is customizable on a site-by-site basis. Different settings can be specified for the control and data channels. In this step, you configure additional SSL settings for your FTP site that ensure that all user credentials are encrypted, even if all other FTP activity is not.

  1. Go to the IIS 7.0 Manager. Click the node for the FTP site that you created in Step 1. The icons for all of the FTP features display.
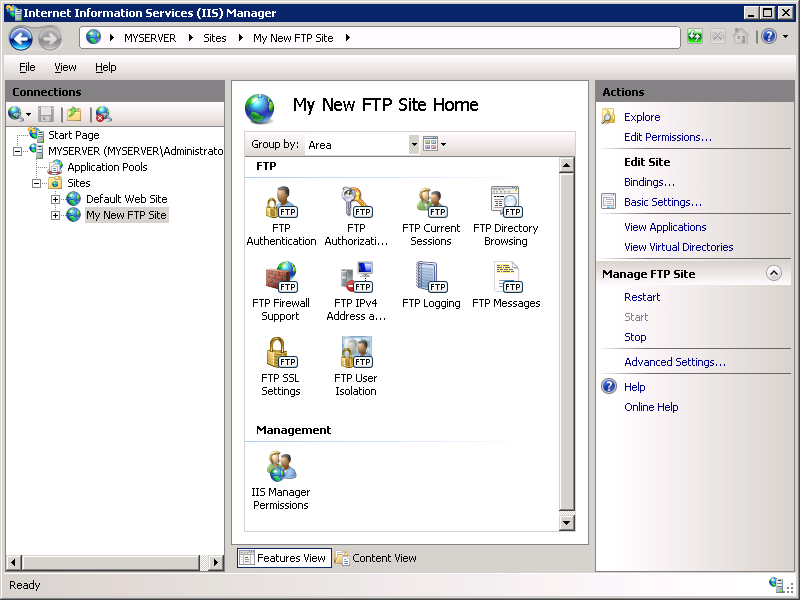
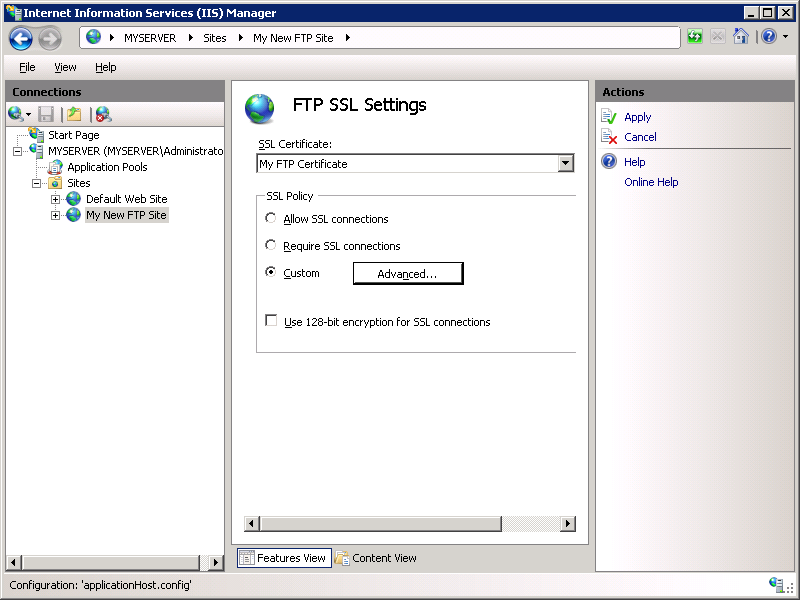
  2. In order to configure the SSL options, double-click the FTP SSL Settings icon to open the SSL settings feature page.
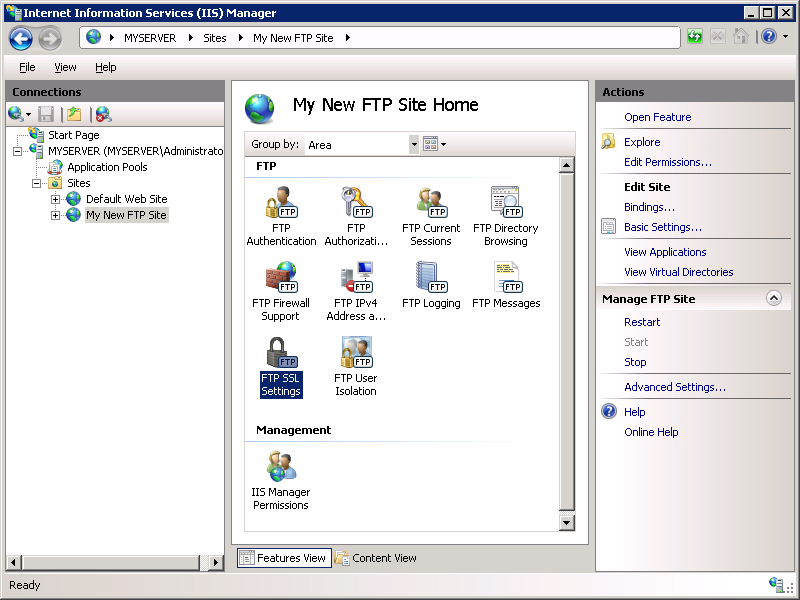
  3. When the FTP SSL Settings page displays, select the Custom option, and then click the Advanced button.
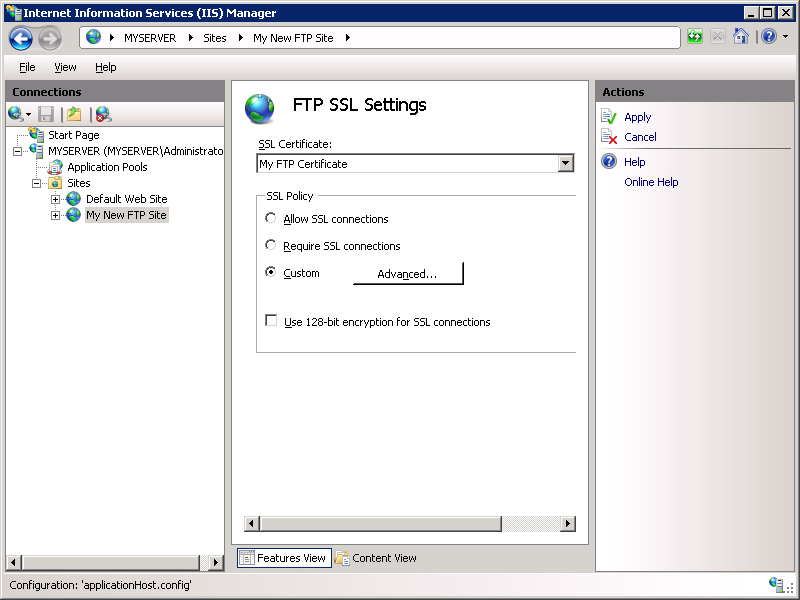
  4. When the Advanced SSL Policy dialog box is displayed:
    • Select the Require only for credentials option for the control channel. Note: This setting requires that all user names and password are encrypted via SSL, but the client can choose whether to encrypt all other control channel activity.
    • Select the Allow option for the data channel. Note: This setting allows the client to choose whether to encrypt any data channel activity.
    • When you have completed these items, click OK.
  5. On the FTP SSL Settings page, click Apply in the Actions pane to save the SSL settings.
Creating Web Applications, Site Collections and Sites in SharePoint 2010

Go to START -> All Programs -> Microsoft SharePoint 2010 Products and click on SharePoint 2010 Central Administration, this will open the Central Administration site UI as shown below. Click on Manage web applications under Application Management in Central Administration page or under Web Applications in the Application Management page.


On the web applications page, in the right pane you will notice all the web applications created so far. On top you will see an Office style ribbon which is a new feature of SharePoint 2010. Because we intend to create a new web application, simply click on the New option in left most side of the ribbon.


This will open up a Create New Web Application page, you need to specify different settings/parameters for your new web application to be created. Some of these settings/parameters are described below:

Once you have specified all of the required/optional parameters on the Create New Web Application page, simply click on the OK button and wait for the web application to be created. Once the web application is created you will see a screen like below. Click on the Create Site Collection link to create a site collection as the web application is not usable unless you create at least one site collection.


On the Create Site Collection page, first you need to specify the Title and Description for your new site collection.
Next you need to specify the URL for your site collection in the Web Site Address section.
Then you need to select one of the several available custom created templates which will be used as a blue-print to create your site collection.
Next you need to specify the Primary Site Collection Administrator, specifying the Secondary Site Collection Administrator is an optional setting, but recommended as it allows secondary administrator to take charge of administration if the primary administrator is not available.
Next if required, you can use the Quota template to restrict growth of your site collection to a certain limit.


Click on the OK button and you are done with the creation of the SharePoint web application. Click on the link and you will see your web application like this.

We normally create a site for each division/department/project.  To create more sites, click on Site Action on the top left corner and you will see several options like this (this is another change from last SharePoint version where it used to be on top right side):

Click on New Site and specify different parameters (Title and URL) for your new site as shown below.

You can create as many sites as you want, for example I have created a couple of different sites for each department of the organization as you can see below.

How Internet Works With OSI Model

The Open System Interconnection Reference Model (OSI Reference Model or OSI Model) is an abstract description for layered communications and computer network protocol design. It was developed as part of the Open Systems Interconnection (OSI) initiative. In its most basic form, it divides network architecture into seven layers which, from top to bottom, are the Application, Presentation, Session, Transport, Network, Data-Link, and Physical Layers. It is therefore often referred to as the OSI Seven Layer Model.

A layer is a collection of conceptually similar functions that provide services to the layer above it and receives service from the layer below it. On each layer an instance provides services to the instances at the layer above and requests service from the layer below. For example, a layer that provides error-free communications across a network provides the path needed by applications above it, while it calls the next lower layer to send and receive packets that make up the contents of the path. Conceptually two instances at one layer are connected by a horizontal protocol connection on that layer.


Application
(Layer 7)
This layer supports application and end-user processes. Communication partners are identified, quality of service is identified, user authentication and privacy are considered, and any constraints on data syntax are identified. Everything at this layer is application-specific. This layer provides application services for file transfers, e-mail, and other network software services. Telnet and FTP are applications that exist entirely in the application level. Tiered application architectures are part of this layer.
Presentation
(Layer 6)
This layer provides independence from differences in data representation (e.g., encryption) by translating from application to network format, and vice versa. The presentation layer works to transform data into the form that the application layer can accept. This layer formats and encrypts data to be sent across a network, providing freedom from compatibility problems. It is sometimes called the syntax layer.
Session
(Layer 5)
This layer establishes, manages and terminates connections between applications. The session layer sets up, coordinates, and terminates conversations, exchanges, and dialogues between the applications at each end. It deals with session and connection coordination.
Transport
(Layer 4)
This layer provides transparent transfer of data between end systems, or hosts, and is responsible for end-to-end error recovery and flow control. It ensures complete data transfer.
Network
(Layer 3)
This layer provides switching and routing technologies, creating logical paths, known as virtual circuits, for transmitting data from node to node. Routing and forwarding are functions of this layer, as well as addressing, internetworking, error handling, congestion control and packet sequencing.
Data Link
(Layer 2)
At this layer, data packets are encoded and decoded into bits. It furnishes transmission protocol knowledge and management and handles errors in the physical layer, flow control and frame synchronization. The data link layer is divided into two sub layers: The Media Access Control (MAC) layer and the Logical Link Control (LLC) layer. The MAC sub layer controls how a computer on the network gains access to the data and permission to transmit it. The LLC layer controls frame synchronization, flow control and error checking.
Physical
(Layer 1)
This layer conveys the bit stream – electrical impulse, light or radio signal — through the network at the electrical and mechanical level. It provides the hardware means of sending and receiving data on a carrier, including defining cables, cards and physical aspects. Fast Ethernet, RS232, and ATM are protocols with physical layer components.

Enabling Telnet Client in Windows 7


Telnet Client allows a computer to connect to a remote Telnet server and run applications on that server. Once logged on, a user is given a command prompt that can be used as if it had been opened locally on the Telnet server's console. Commands that you type at the Telnet client command prompt are sent to the Telnet Server and executed there, as though you were locally logged on to a command prompt session at the server. Output from the commands that you run are sent back to the Telnet client where they are displayed for you to view.

When you first try to run a telnet command, Windows will informs you that telnet is not recognized as a command

To enable Telnet Client on Windows 7, follow these steps :
  1. Click on Start   then right click on Control Panel


  2. From Control Panel, click on Programs


  3. Under Programs and Features, click on Turn Windows Features on or off


  4. From the Windows Features window, using the slider, scroll down till you reach Telnet Client, select the checkbox beside it, then click on OK


    The selected feature will be installed.


    Once it is installed, the Windows Features windows will be closed.

  5. To confirm that Telnet is installed, open command prompt and type telnet /?


File Server Resource Manager Windows Server 2008

File Server Resource Manager enables system administrators to understand how storage is being used and to manage the use of their storage by generating storage reports, applying quotas to volumes and folders, and screening files on the server.

File Server Resource Manager is a suite of tools that allows administrators to understand, control, and manage the quantity and type of data stored on their servers. By using File Server Resource Manager, administrators can place quotas on volumes, actively screen files and folders, and generate comprehensive storage reports. This set of advanced instruments not only helps the administrator to efficiently monitor existing storage resources, but it also aids in the planning and implementation of future policy changes.

By using File Server Resource Manager, you can perform the following tasks:

  • Create quotas to limit the space allowed for a volume or folder and generate e-mail and other notifications when the quota limits are approached or exceeded.
  • Automatically generate and apply quotas to all existing subfolders and any new subfolders in a volume or folder.
  • Create file screens to control the type of files that users can save, and send notifications when users attempt to save blocked files.
  • Define quota and file screening templates that can be easily applied to new volumes or folders and reused across an organization.
  • Schedule periodic storage reports that help identify trends in disk usage, or generate storage reports instantly, on demand.

How to solve copy paste not working issue in Remote Desktop?


The clipboard sharing is handled using a small application running on the remote machine, called "RDPCLIP.EXE". If this application fails to do the job, your clipboard sharing will stop working and you will not be able to copy paste text, data or files from local computer to remote server using remote desktop connection.

Here is how you can solve this problem:

1. Login to remote computer using Remote Desktop (RDP)

2. Open Task Manager in the remote machine

3. Click the "Process" tab

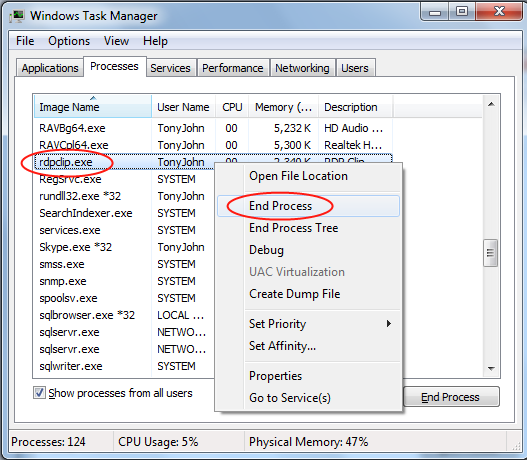
4. Locate a program called "rdpclip.exe"

5. Right click and select "End process" to kill this program

6. Click on "File" menu in the task manager and select "New Task (Run)"

7. Type rdpclip.exe and press the button to start the process.

Kill rdpclip.exe to resolve copy paste not working error in Remote Desktop

By killing existing instance of the rdpclip.exe and restarting the program, you can get your copy paste work again in your remote desktop.