IP v6 Connecting Tomorrow's Internet Today

An Internet Protocol Version 6 address (IPv6 address) is a numerical label that is used to identify a network interface of a computer or other network

This is default featured slide 2 title

Go to Blogger edit html and find these sentences.Now replace these sentences with your own descriptions.This theme is Bloggerized by Lasantha Bandara - Premiumbloggertemplates.com.

Team Work...

"a joint action by a group of people, in which each person subordinates his or her individual interests and opinions to the unity and efficiency of the group."

This is default featured slide 4 title

Go to Blogger edit html and find these sentences.Now replace these sentences with your own descriptions.This theme is Bloggerized by Lasantha Bandara - Premiumbloggertemplates.com.

System fail situation in network server room

A system failure can occur because of a hardware failure or a severe software issue. Commonly, a system failure will cause the system to freeze, reboot, or stop functioning altogether.

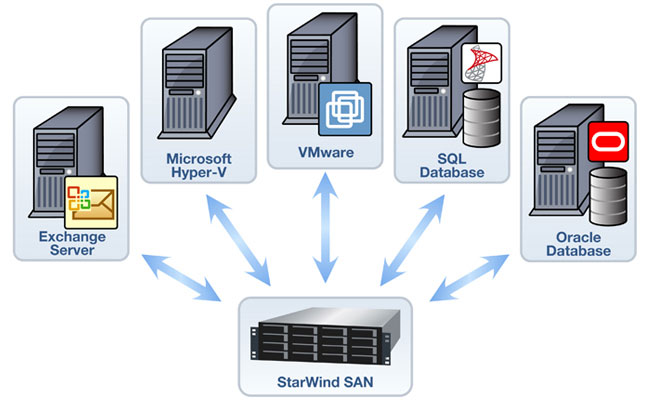
Optimizing Servers, Data and Storagewith End-User Provision

A new server and storage system can keep your businesses current with technology and best practices, reduces cost, provide quickly Return On Investment on your business and help end users become more productive and collaborate

Exchange server 2010 installing step by step part 4 | Add role - Active Directory Lightweight Services

Step 1: Installing AD LDS

The following steps will walk you through installing Active Directory Lightweight Directory Services on a computer that is running Windows Server 2008.

Adding the AD LDS Role

  1. Open the Windows Server 2008 Server Manager, click Roles in the navigation pane, and then click Add Roles.
  2. Check the box for Active Directory Lightweight Directory Services, and then click Next.
  3. Read the information on the Introduction to Active Directory Lightweight Directory Services page, and then click Next.
  4. Verify the Confirmation Installation Settings, and then click Next.
  5. The installation will start; this may take several minutes to complete.
  6. When the installation has completed, click Close.

Exchange server 2010 installing step by step part 3 | Active directory installation

Add role - Active Directory Services
The process of installing Active Directory consists of two steps:  the first step is to install Active Directory and the second step is to configure your Active Directory.  Once this is complete, your Windows Server will now be a Domain Controller.
Step 1 - Install Active Directory
At the Computer Management Screen, press the "Add Roles" link. 
At the Select Server Roles dialog, check/tick the option "Active Directory Domain Services".
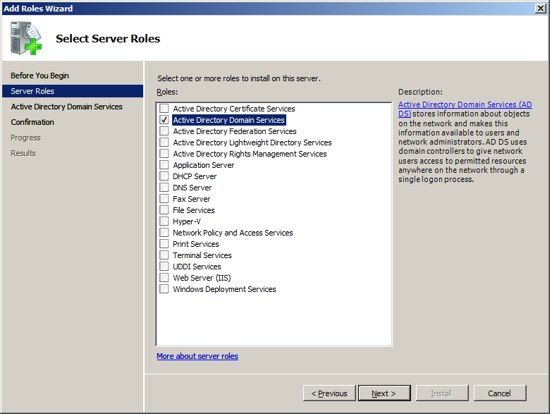
When you select Active Directory the Select Server Roles Screen will inform you that you also need to install the feature ".NET Framework 3.5.1".  Press the "Add Required Features" button.
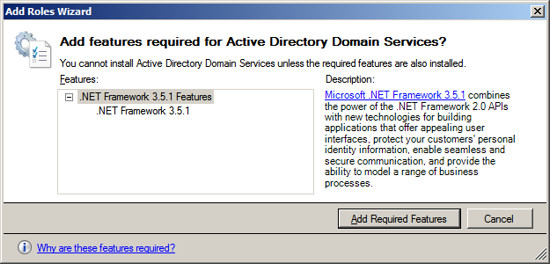
After acknowledging the required feature, press Next.
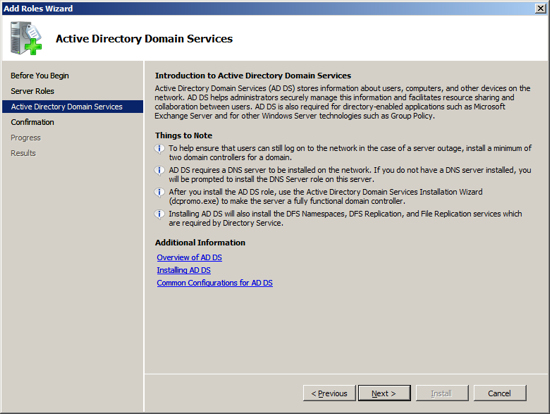
Active Directory Domain Services will present information about the changes it will make to your server.  Review this information and press Next.
Now the installation will scan your configuration and inform you if there are any pre-requisites that you have not fulfilled.  If the Active Directory Installation presents an errors, correct these at this time and then repeat the installation.  Once the Setup program indicates that you have met all pre-requisites, then press the Install button to start the installation process.
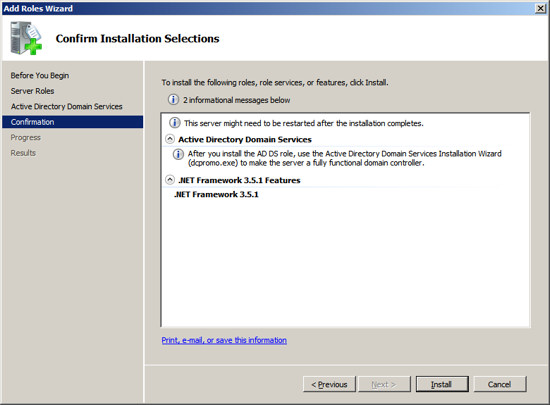
The setup program will now install Active Directory on your Server.
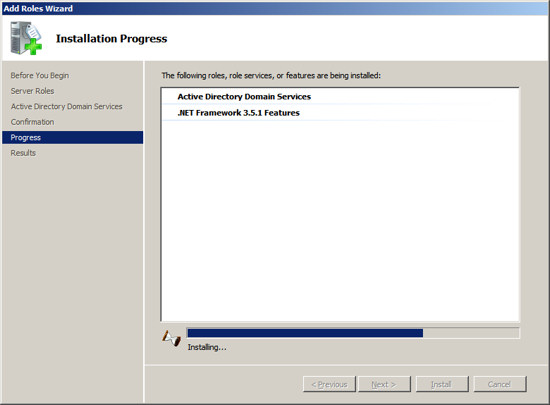
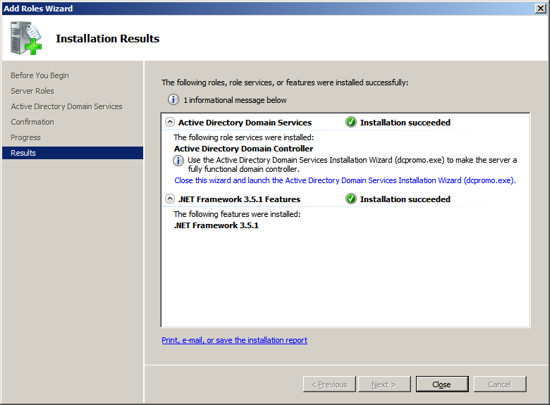
When the installation is complete, you should see a message indicating "Installation Succeeded". 
Press Close to return to the Server Management Screen.
Step 2 - Configure Active Directory
At the Server Management screen you should now see that you have 1 role installed.  The Active Directory Domain Services may indicate that it is installed but there are errors.  This is because the software is installed but not configured.
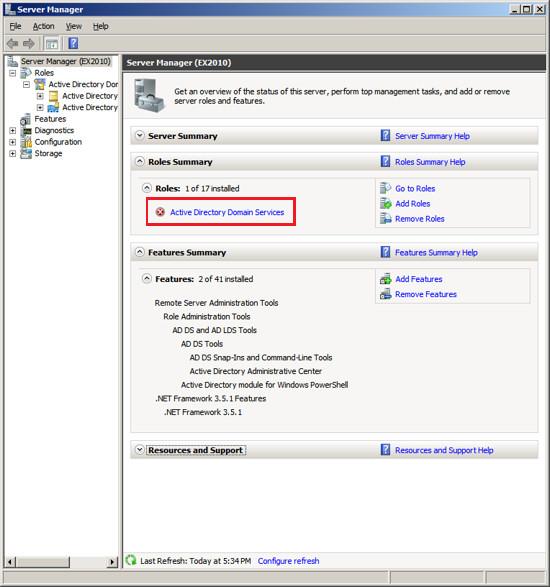
To configure Active Directory, click on the line under Roles labeled "Active Directory Domain Services".  The Server Manager will show you a page about the status of the Active Directory Role.
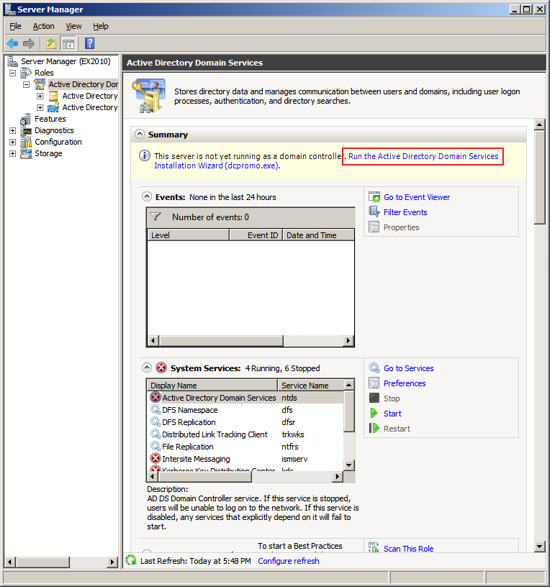
Click on the link "Run the Active Directory Services Installation Wizard (dcpromo.exe)".  When the Active Directory Domain Services Installation Wizard appears, press Next.
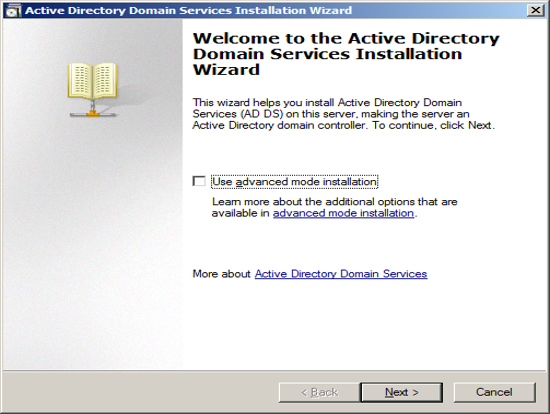
The Installation Wizard will present information about the version of Active directory, press Next.
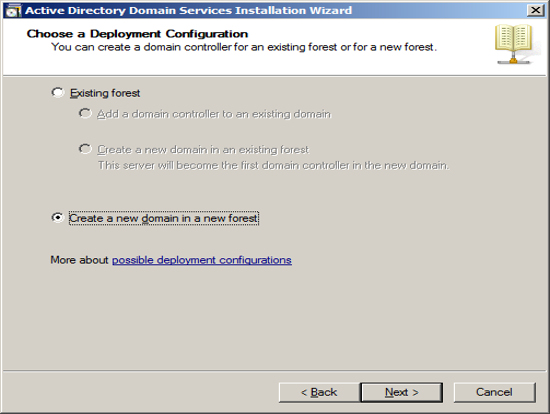
Since we are assuming this Exchange Server will be the first Domain Controller, we choose "create a new domain in a new forest".  Press Next.
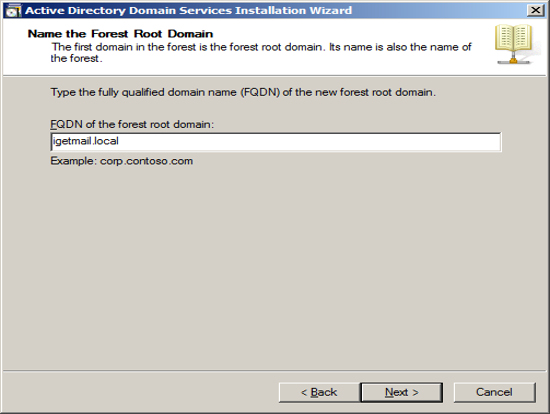
Enter the name of your domain.  The domain name you enter here is the domain name that Exchange will associated with all of your email.  If you use a hosting company to host your Internet Domain, then you may want to enter the name of your Internet domain with ".local".  If you host your own Internet Domain then you would enter your domain name here.
In our example, we are assuming that IGetMail.com is hosted at an Internet Hosting Company.  Since we do not host IGetMail.com on this Exchange Server, we will use IGetMail.local to indicate our internal domain for IGetMail. 
NOTE:  Once you enter your domain name it is very hard to change it in the future, so you should take great care when enter this name. 
Once you have decided on the name of your internal domain, that will be your Active Directory Domain and the domain serviced by Exchange, press Next.
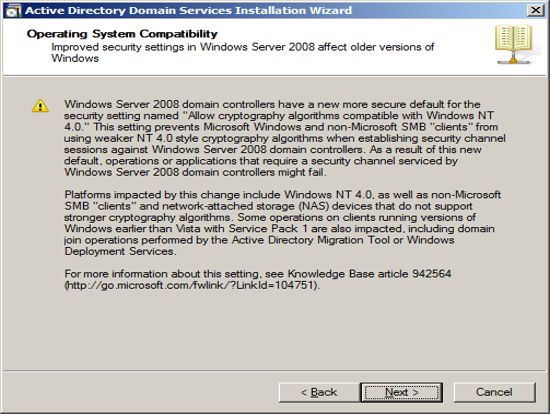
The Installation Wizard will now ask you about compatibility.  If you plan to have domain controllers running various versions of Active Directory, then you will want to chose a function level to include the lowest version of Windows that you are using for domain controllers.  Press Next.
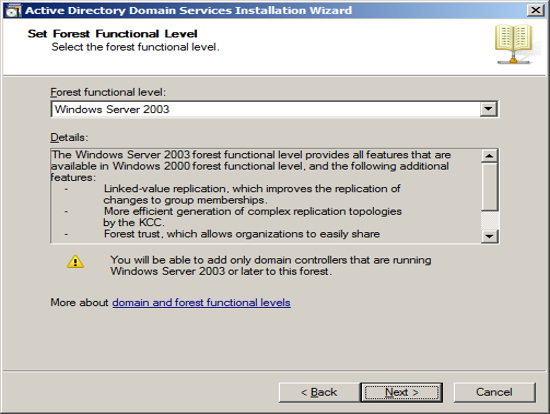
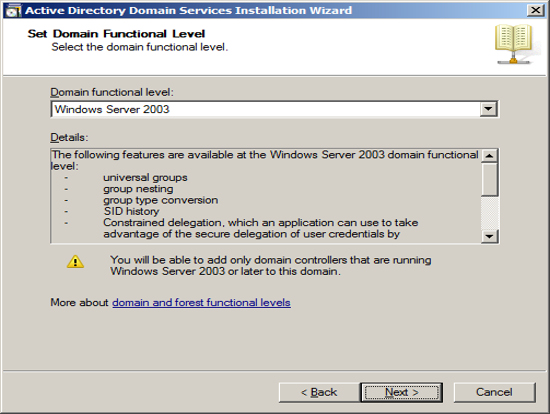
You will be asked a similar question which is at the domain level instead of the forest level on the previous screen.  You should follow the same approach and include the function level to include the lowest version of Windows you plan to use for domain controllers.  Press Next.
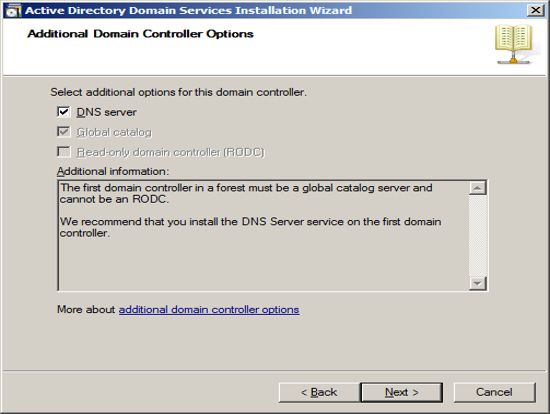
The first Domain Controller needs to have a DNS server running locally.  The optimal location is to start out with having the installation wizard install the DNS server locally.  Also, it will automatically make this computer a global catalog server.  Press Next.
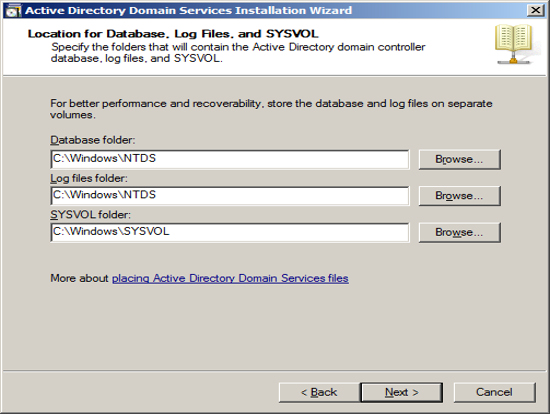
You can specify where you want Active Directory to store its data.  If you only have one drive in your Server, then use the defaults.  If you have multiple drives, you can select which drive to use.  Press Next.
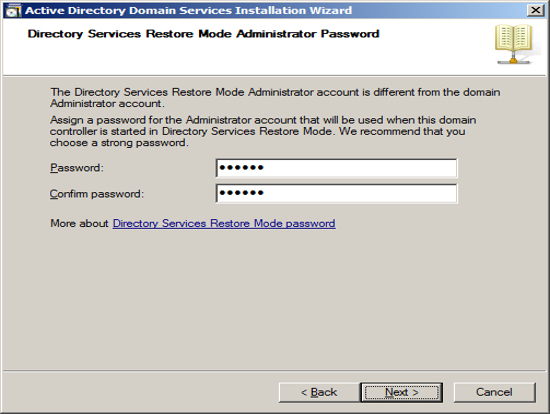
Should you need to restore Active Directory in the event of a hard drive failure, you will need to boot your Server into a special mode called "Directory Restoration Mode".  Should you need to boot your computer into this special mode, you will need to use a special password just for this restoration.  You can define this password at this time.  NOTE:  This password is different than the administrator account and if you change the administrator password this password will not change.  So you will need to store this password forever in a safe place.  Press Next.
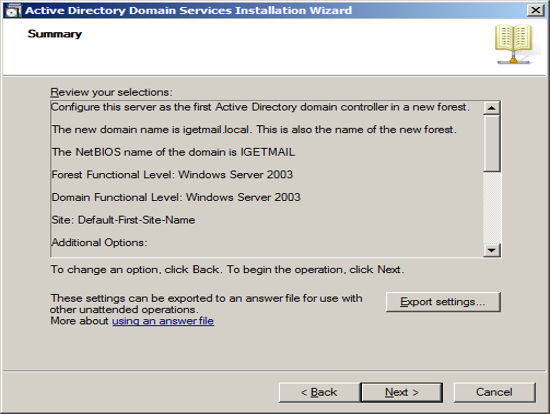
Now the Installation Wizard will summarize the configuration that it is about to create.  To start the process of configuring your new Domain Controller, press Next.
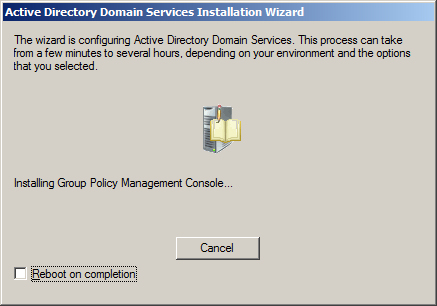
The Installation Wizard will show its progress as it configures your Server.   This will take a long time.
When the installation is complete, you will be shown a final screen.  Press Finish.
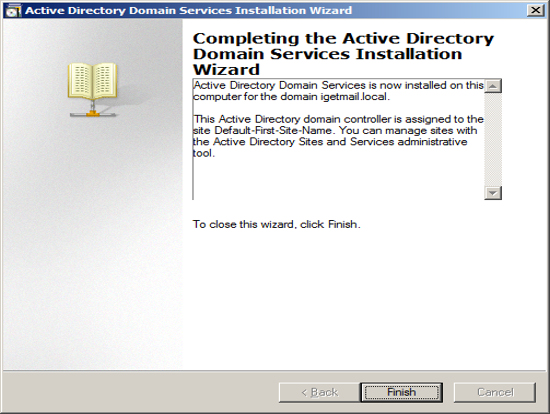
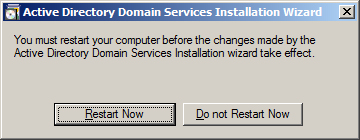
Then restart your computer.
After restarting your computer, Windows should show you the Server Manager.  You should see on the Server Manager screen that you have Active Directory and DNS Server roles installed.  Also the process of installing Active Directory will add the features "Group Policy Management" and "Remote Server Administration Tools".

Exchange server 2010 installing step by step part 2 | Configure Your Static IP Address


Configure Your Static IP Address
The default installation of Windows 2008 sets your IP v4 and IP v6 addresses to use DHCP.  Since we will be configuring this computer to be a domain controller, you must change the IP address of the computer to be a static IP address.
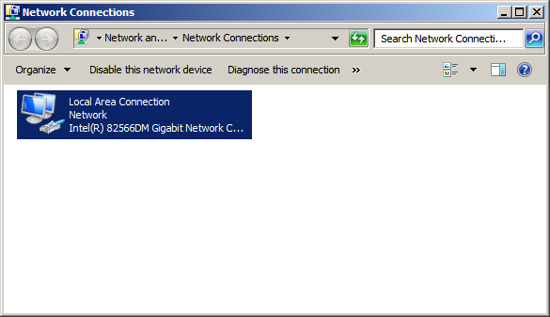
To change your IP address, click on "View Network Connections" in the Server Manager screen.  This will display the list of active network interfaces.

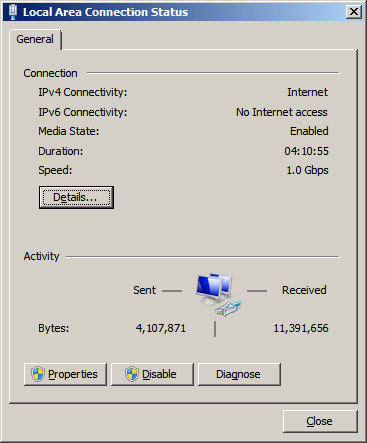
Double click on your network adaptor to display the adaptors status.

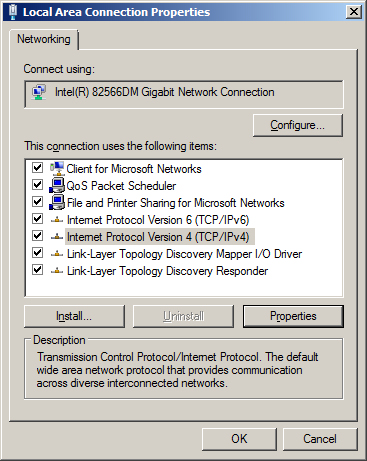
Press the Properties button.

Highlight "Internet Protocol Version 4 (TCP/IPv4)" and then press the Properties button.

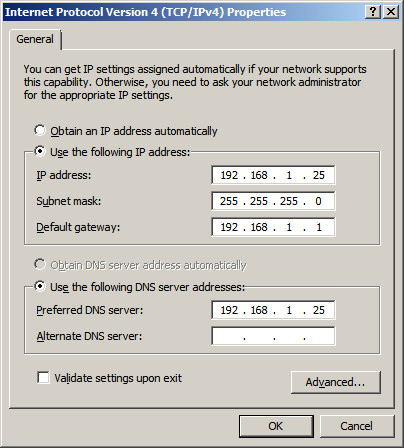
Change the radio button to "Use the following IP address" and enter an IP address you want to use for this server.  In our example, we chose to assign this server the internal IP address "192.168.1.25".  We also have a firewall appliance that operates as a gateway at the IP address "192.168.1.1". 
NOTE: It is important to include this computer in the DNS list.  You should list the IP address of this computer as the first entry in the list of DNS servers.  In the alternate DNS servers field, enter the IP address of a DNS server provided by your ISP.
Press OK to save your changes.
Now you will need to modify the support for IP v6.  If your network uses IP v6, then you will need to select "Internet Protocol Version 6 (TCP/IPv6)" , press the Properties button, then enter a static address.  If you are not using IP v6, you can leave the IP v6 set to the default setting of DHCP.
NOTE:  Exchange requires that IP V6 be enabled.  Even if you do not use IP V6 you must leave it enabled.  During the setup of Active Directory, the Active Directory Setup Wizard will check that both IP v4 and IP v6 have static addresses.  As long as the IP v4 address is static you can continue the installation.  DO NOT DISABLE IP V6 or else the Exchange Hub Transport Service will not start.
At this point you should have all IP addresses on this server configured as static IP addresses.  OR you have the IP v4 address configured as static and the IP v6 configured using DHCP.  Press OK to save your changes and close the Network Connection screen.

Exchange server 2010 installing step by step part 1 | Pre-Installation Check list:

Pre-Installation Check list: 
1) Install Windows Server 2008 R2 64 bit version or any other 64 bit Operating System
  •   Configure the static IP address
  •   Activate Auto Updates
  •   Add role - Active Directory Services
  •   Add role - Active Directory Lightweight Services
  •   Add feature - Windows Process Activation Service
  •   Add role - Web Server (IIS) (*Refer note below)
  •   Add feature – PowerShell          
2) Enable TCP Port Sharing
3) Installing Exchange Server 2010
4) To setup Authenticated Access
5) Adding Email User

70-643 syllabus

70-643 -Windows Server 2008 Application Infrastructure, Configuring:

 
Deploy Servers

-Deploy images by using Windows Deployment Services

-Configure Microsoft Windows Activation

-Configure high availability

-Configure storage

 
Configuring Terminal Services


-Configure Windows Server 2008 Terminal Services RemoteApp (TS RemoteApp)

-Configure Terminal Services Gateway

-Configure Terminal Services load balancing

-Configure and monitor Terminal Services resources

-Configure Terminal Services Licensing

-Configure Terminal Services client connections

-Configure Terminal Services server options


Configuring a Web Services Infrastructure

-Configure Web applications

-Manage Web sites

-Configure a File Transfer Protocol (FTP) server

-Configure Simple Mail Transfer Protocol (SMTP).

-Manager Internet Information Services (IIS)

-Configure SSL security

-Configure Web site authentication and permissions

 
Configuring Network Application Services

 
-Configure Windows Media Server

-Configure Digital Rights Management (DRM)

-Configure Microsoft Windows SharePoint Services server options

-Configure Windows SharePoint Services e-mail integration.

What Is WINS? :Role of WINS in the Network:

Role of WINS in the Network


Although NetBIOS and NetBIOS names can be used with network protocols other than TCP/IP, WINS was designed specifically to support NetBIOS over TCP/IP (NetBT). WINS is required for any environment in which users access resources that have NetBIOS names. If you do not use WINS in such a network, you cannot connect to a remote network resource by using its NetBIOS name unless you use Lmhosts files, and you might be unable to establish file and print sharing connections.

WINS Name Registration and Resolution
WINS Name Registration and Resolution In a typical scenario, the following occurs:
  1. ClientA, which uses NetBIOS and is a WINS client, sends a name registration request to its configured primary WINS server (WINSA) when it starts up and joins the network. WINSA adds ClientA's NetBIOS name and IP address to the WINS database.
  2. When ClientB needs to connect to ClientA by its name, it requests the IP address from the WINS server.
  3. The WINS server locates the corresponding entry in its database and replies with ClientA's IP address.

Summary of WINS Benefits


WINS provides the following benefits over other NetBIOS name resolution methods:
  • WINS name resolution reduces NetBIOS name query broadcast traffic because clients can query a WINS server directly instead of broadcasting queries.
  • WINS enables the Computer Browser service to collect and distribute browse lists across IP routers.
  • The WINS dynamic name-to-address database supports NetBIOS name registration and resolution in environments where DHCP-enabled clients are configured for dynamic TCP/IP address allocation.
  • The WINS database also supports centralized management and replicates name-to-address mappings to other WINS servers.
  • WINS and DNS can be used in the same environment to provide combined name searches in both namespaces.


WINS and DNS


WINS and DNS are both name resolution services for TCP/IP networks. While WINS resolves names in the NetBIOS namespace, DNS resolves names in the DNS domain namespace. WINS primarily supports clients that run older versions of Windows and applications that use NetBIOS. Windows 2000, Windows XP, and Windows Server 2003 use DNS names in addition to NetBIOS names. Environments that include some computers that use NetBIOS names and other computers that use domain names must include both WINS servers and DNS servers.

Related Information


The following resources contain additional information that is relevant to this section.

How To Activate Exchange Server 2010

1) Open Exchange Server Management Console

Click on Start > All Programs > Microsoft Exchange Server 2010 > Microsoft Exchange Management Console


  • Once the Management Console is opened, it will display for you the unlicensed exchange servers and the remaining days for the trial period.


  • In the console tree, navigate to Server Configuration


  • From the right side pane, in the Actions pane, click on Enter Product Key...


  • On the Enter Product Key page, enter the product key, then click Enter


  • On the Completion page, a status message will be displayed showing you if either the wizard completed successfully or it failed. If it failed, then click Back to make any configuration changes.


    After you have a successful Exchange Server activation, you can see that the Enter Product Key... option is not available anymore under the Actions pane.


    Note : You must restart the Microsoft Exchange Information Store service so that the change is applied.
  • ...................................................................()()()()()()..................................................................
     
    2)
    Your Exchange server will run for 120 days without a product key but you should enter one as soon as possible and certainly before placing the server into production.
    Launch the Exchange Management Console from the Start Menu of the server.  A warning will appear listing each Exchange server that is currently unlicensed.  Click OK to clear the warning.
    In the left pane of the Exchange Management Console navigate to Server Configuration.  Right-click the server in the middle pane and choose Enter Product key.

    Enter your Product Key in the field and then click the Enter button.

    You will see a message when the Product Key has been applied warning you that the change does not take effect until the Information Store service is restarted.  Close the warning dialog box.


    Installing DHCP and Windows Deployment Services

    DHCP Introduction

    When you deploy Dynamic Host Configuration Protocol (DHCP) servers on your network, you can automatically provide client computers and other TCP/IP-based network devices with valid IP addresses. You can also provide the additional configuration parameters these clients and devices need, called DHCP options, that allow them to connect to other network resources, such as DNS servers, WINS servers, and routers.

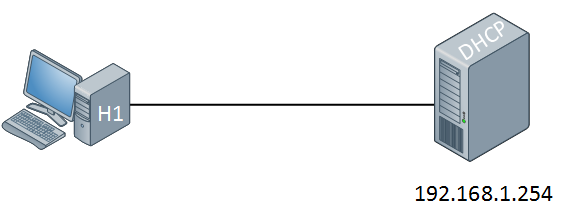
     IP addresses can be configured statically or dynamically. Normally we configure static IP addresses on network devices like routers, switches, firewalls and servers while we dynamically assign IP addresses to computers, laptops, tablets, smartphones etc. The dynamic method uses DHCP (Dynamic Host Configuration Protocol) and in this short article I want to show you how it works. Let’s take a look at the following picture:

    DHCP Topology

    On the left side we have a computer without IP address. On the right side there’s a DHCP server configured with static IP address 192.168.1.254. This DHCP server will supply an IP address to our computer, this is how it works:

    DHCP Discover

    The computer will send a DHCP discover message. This is a broadcast because it doesn’t have an IP address and it doesn’t know if there is a DHCP server on the network. Of course in our scenario we do have a DHCP server so it will respond to this broadcast as following:

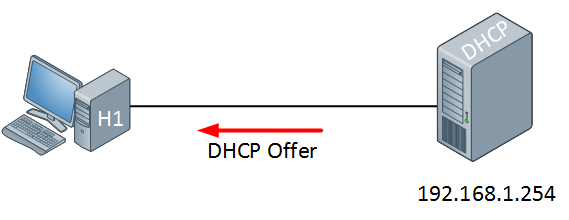
    DHCP Offer

    The DHCP server will respond with a DHCP offer message which contains an IP address for the computer (we have to configure the DHCP server to define which IP addresses we want to give). If we want we can also assign a default gateway and DNS server(s) to the computer. The computer will respond to this information:

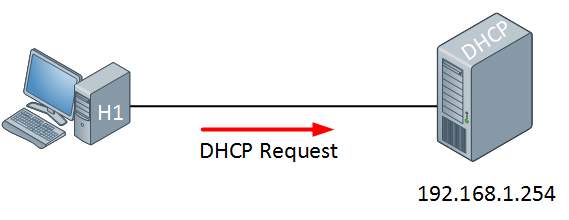
    DHCP Request

    The computer will send a DHCP Request in response to the DHCP offer message, asking nicely if it’s OK to use the information that it has received. Our DHCP server will respond to this as following:

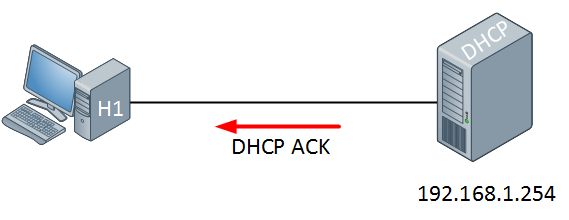
    DHCP ACK

    The DHCP server will respond with a DHCP ACK message to tell the computer it’s OK


    • Before installing WDS we have to create a new partition to hold our image files
      1. Open Server Manager
      2. Click Storage
      3. Click Disk Management
      4. Right click Unallocated
      5. Click Create New Volume
      6. Click Next
      7. Click Next
      8. Change drive letter to I
      9. File: NTFS
      10. Allocation: default
      11. Click Next
      12. Volume label: Images
      13. Check Perform Quick Format
      14. Click Next
      15. Click Finish
    pic1
    • Open Server Manager
      1. Click Roles in menu at top left
      2. Click Add Roles at right
    pic2
    • Check Skip this page by default
    • Click Next
    pic1
    • Select Server Roles
      1. Check DHCP
      2. Check Windows Deployment Services
      3. Click Next
    pic2
    • Overview of Windows Deployment Services
      1. Click Next
    pic3
    • Select Roles Services
      1. Click Next
    pic4
    • Check box next to 192.168.9.1
    • Click Next
    pic8
    • Specify IPv4 DNS Server Settings
      1. Parent Domain: Adatum9.com
      2. Preferred DNS Server IPv4 Address: 192.168.9.1
      3. Alternate DNS Server IPv4 Address: 192.168.9.2 (Virtual Server)
      4. Click Next
    pic6
    • Specify IPv4 WINS Server Settings
      1. Check radio button next to: WINS is not required for applications on this network
      2. Click Next
    pic7
    • Add or Edit DHCP Scopes
      1. Click Add
    pic8
    • Add Scope
      1. Scope Name: scope9
      2. Starting IP Address: 192.168.9.1
      3. Ending Ip Address: 192.168.9.10
      4. Subnet Mask: 255.255.255.0
      5. Default Gateway (optional): 192.168.9.1
      6. Subnet Type: Wired (lease duration will be 6 days)
      7. Click OK
    • Click Next
    pic9
    • Configure DHCPv6 Stateless Mode
      1. Check Disable DHCPv6 stateless mode for this server.
      2. Click Next
    pic10
    • Authorize DHCP Server
      1. Check Use current credentials
      2. Click Next
    pic11
    • Confirm Installation Selections
      1. Click Install
    pic12
    • Installation Results
      1. Click Close
    • Go to Start\Administrative Tools\DHCP
    • Click Properties
    • Click + beside of DHCP
    • Click + beside of IPv4
    • Right click Scope and choose Properties
    pic13
    • Click Advanced tab
    • Check Both
    • Click OK
    • How to exclude a range of ip addresses from the DHCP pool.
    • Right click the address pool
    • Click New Exclusion Range
    pic14
    • 192.168.9.1
    • 192.168.9.2
    • Click Add
    • Click Close
    • Close DHCP Window