IP v6 Connecting Tomorrow's Internet Today

An Internet Protocol Version 6 address (IPv6 address) is a numerical label that is used to identify a network interface of a computer or other network

This is default featured slide 2 title

Go to Blogger edit html and find these sentences.Now replace these sentences with your own descriptions.This theme is Bloggerized by Lasantha Bandara - Premiumbloggertemplates.com.

Team Work...

"a joint action by a group of people, in which each person subordinates his or her individual interests and opinions to the unity and efficiency of the group."

This is default featured slide 4 title

Go to Blogger edit html and find these sentences.Now replace these sentences with your own descriptions.This theme is Bloggerized by Lasantha Bandara - Premiumbloggertemplates.com.

System fail situation in network server room

A system failure can occur because of a hardware failure or a severe software issue. Commonly, a system failure will cause the system to freeze, reboot, or stop functioning altogether.

Optimizing Servers, Data and Storagewith End-User Provision

A new server and storage system can keep your businesses current with technology and best practices, reduces cost, provide quickly Return On Investment on your business and help end users become more productive and collaborate

How to install the Microsoft Loopback adapter in Windows 7

Microsoft Loopback adapter
For some reason, the Add New Hardware wizard is missing the Microsoft Loopback adapter in the Control Panel in the Beta build of Windows 7 (build 7000). That makes it rather hard to install the loopback adapter. However, you can actually still start the wizard following these instructions.
Click on the Windows Orb (The old Start button) or press the WIN key.
Screenshot
Type hdwwiz.
Screenshot
Click Next
Screenshot Microsoft Loopback adapter
Select the Install the hardware that I manually select from a list (Advanced) option and click Next.

Screenshot
Select Network Adapters and click Next
Screenshot adapter
Select Microsoft and the Microsoft Loopback Adapter and click Next.
Screenshot adapter
Click Next and you are done.

Windows Server 2012 features Top 10 best

1. SMB 3.0

SMB 3.0 is the crown jewel of Server 2012. It is far removed from its laughingstock predecessor CIFS. It supports multiple simultaneous network interfaces – including the ability to hot-plug new interfaces on the fly to increase bandwidth for large or complex transfers – and supports MPIO, thin provisioning of volumes and deduplication (assuming the underlying storage is NTFS).
SMB 3.0 also supports SMB Direct and remote direct memory access, the ability for appropriately kitted systems to move SMB data directly from one system's memory to the other, bypassing the SMB stack. This has enabled Microsoft to hit 16GBps transfer rates for SMB 3.0, a weighty gauntlet for any potential challenger to raise.
I have found Server 2012 to be worth the cost of the upgrade, even where I have the excellent Server 2008 R2 deployed. Given that I work with very limited IT budgets, that is a strong endorsement.


2. NFS 4.1
Microsoft's NFS 4.1 server is good code. Designed from the ground up it is is fast, stable and reliable. It makes a great storage system for heterogenous environments and a wonderful network storage point for VMware servers.
3. iSCSI
With Windows Storage Server 2008, Microsoft first made an iSCSI target available. It eventually became an optional download from Microsoft's website for Server 2008 R2 and is now finally integrated into Server 2012 as a core component.
4. Hyper-V Replica
Hyper-V Replica is a storage technology designed to continuously replicate your virtual machines across to a backup cluster. It ensures that snapshots no more than 15 minutes old of your critical virtual machines are available over any network link, including the internet.
It replicates the initial snapshot in full – after that it sends only change blocks – and it fully supports versioning of your virtual machines.
5. Hyper-V 3.0
Server 2012 sees Hyper-V catch up with VMware's mainstream. While objectively I would have to say that VMware retains the feature lead at the top end, when combined with System Center 2012, Hyper-V 3.0 will cheerfully handle two-sigma worth of use cases.
Microsoft is no longer an also-ran in the virtualisation space; it is a capable and voracious predator stalking the wilds of the data centre for new prey.
Microsoft's Hyper-V Server – a free Windows Core version of Hyper-V – is feature complete. If you have a yen to dive into PowerShell then you can run a complete 64-node, 8,000 virtual machine Hyper-V cluster without paying Microsoft a dime.
It takes a very special kind of masochist to do so – Microsoft is betting you will spend the money on System Center 2012 and it is probably right. System Center 2012 is amazing, even more so with the newly launched Service Pack 1.
Microsoft's focus on PowerShell and its decision to put price pressure on VMware with Hyper-V server has opened up a market for third-party management tools such as 5Nine. These are not nearly as capable as System Center, but offer a great mid-point between free and impossible to manage and awesome but too expensive. This emerging ecosystem should see Hyper-V's market share explode.
6. Deduplication
For years now, storage demand has been growing faster than hard drive density. Meeting our voracious appetite for data storage has meant more and more spindles, and more controllers, chassis, power supplies, electricity and cooling to keep those spindles spinning.
Deduplication has moved from nice to have to absolute must in recent years and Microsoft has taken notice. Server 2012 supports deduplication on NTFS volumes – though tragically it does not work with CSV – and deeply integrates it with BranchCache to save on WAN bandwidth.
7. Cluster Shared Volumes
With Server 2012 Cluster Shared Volumes are officially supported for use beyond hosting virtual hard disks for Hyper-V. You may now roll your own highly available multi-node replicated storage cluster and do so with a proper fistful of best-practice documentation.

8. DirectAccess
DirectAccess was a neat idea but it was poorly implemented in previous versions of Windows. Server 2012 makes it easier to use, with SSL as the default configuration and IPSec as an option. The rigid dependence on IPv6 has also been removed.
DirectAccess has evolved into a reasonable, reliable and easy-to-use replacement for virtual private networks.

9. PowerShell
PowerShell 3.0 is an evolution rather than a revolution. Having more PowerShell scriptlets is not normally something I would care about. That said, the 2012 line of products marks a revolution in Microsoft's approach to server management.
Every element of the operating system and virtually every other companion server, such as SQL, Exchange or Lync, are completely manageable through PowerShell. This is so ingrained that the GUIs are just buttons that call PowerShell scripts underneath.
PowerShell should be tops on this list but to make proper use of it, your Google-fu has to be strong. The official documentation is incomplete, Bing is still worthless for searching Microsoft's web estate and the golden examples for making use of PowerShell lie in the blogs maintained by Microsoft's staff.
Once you have assembled the list of scriptlets you need – printed, laminated and guarded by a fire elemental as in days of old – you can make the 2012 stack of Microsoft software sing. Thanks to PowerShell, Microsoft is ready to take on all comers at any scale.
 

10. IIS 8

IIS 8 brings Internet Information Services up to feature parity with the rest of the world, and surpasses it in places. More than a decade's worth of "you use Windows as your web server" jokes officially end here.
IIS 8 sports script precompilation, granular process throttling, SNI support and centralised certificate management. Add in a FTP server that finally, mercifully, doesn't suck (it even has functional login restrictions) and IIS 8 becomes worth the cost of the operating system on its own.

Network Interface Card NIC Teaming


NIC teaming is a built-in feature of Windows Server 2012, and allows you to provide fault tolerance for your network adapters. NIC teaming allows multiple network interfaces to work together as a team, preventing connectivity loss if one network interface card fails. It allows a server to tolerate network interface card and port failure up to the first switch segment. NIC teaming also allows you to aggregate bandwidth from multiple network adapters, for example, so four 1-gigabit (Gb) network adapters can provide an aggregate of 4 Gb/second of throughput.

Requirements
NIC Teaming requires the presence of a single Ethernet network adapter, which can be used for separating traffic that is using VLANs. All modes that provide fault protection through failover require at least two Ethernet network adapters. Windows Server® 2012 supports up to 32 network adapters in a team.

NIC Teaming architecture
Today, all NIC Teaming solutions on the market have a similar architecture, as shown in Figure 1.
Standard NIC teaming solution architecture                  Teaming solution architecture
Two or more physical network adapters are connected to the NIC Teaming solution multiplexing unit, which then presents one or more virtual adapters (also known as team network adapters) to the operating system. There are several different algorithms that distribute inbound and outbound traffic between the physical network adapters. In current non-Microsoft NIC Teaming solutions, the team network adapters divide traffic by virtual LAN (VLAN) so that applications can connect to different VLANs at the same time. Technically, this separation of traffic is not part of NIC Teaming. However, because other commercial implementations of NIC Teaming have this capability, the Windows Server 2012 implementation also includes it.


1. Open Server Manager, click on All Servers or Hyper-V on the left-hand side pane, then right-click on the server, HOST1 to enable NIC teaming and select Configure NIC Teaming.
1
2. In the NIC Teaming dialog-box, click on TASKS and click New Team.
2
3. In the New team dialog-box, In Team name: type Corporate External Team as the Team name and under Member adapters select the network adapter to add to the NIC teaming. Under Additional properties, select the Teaming mode: Switch Independent, Load balancing mode: Hyper-V Port, Standby adapter: None (all adapters Active), Primary team interface: Corporate External Team: Default VLAN and then Click OK.
3
4. For the few seconds, we get Fault Status in NIC Teaming dialog-box and then get Online Status.
4
4b
5. Under ADAPTERS AND INTERFACES, Click Team Interfaces Tab, Right-Click on Team Interface name, Corporate External Team and Click Properties.
5
6. In the Network Adapter Properties dialog box, under General information, noted Description: Microsoft Network Adapter Multiplexor Driver. Verify Default VLAN membership and Click OK.
6
7. In the Network Control Panel, verify Microsoft Network Adapter Multiplexor Protocol under Team Network Properties.
7
8. In Hyper-V Manager, on the Action pane, click Virtual Switch Manager. In the Virtual Switch Manager dialog box, select New virtual network switch, Ensure that External is selected and Click on Create Virtual Switch. Under External network select Microsoft Network Adapter Multiplexor Driver then Click Apply, review the warning, and then click Yes.
8
9. Open the Settings of Hyper-V virtual machine, click Network Adapter on the left pane, and select Corporate Network under Virtual switch. Then Click Advanced Features on left pane, then Click on Enable this network adapter to be part of a team in the guest operating system under NIC Teaming, Click Apply and Click OK.
9
9b
10.To verify NIC Teaming, Unplug Network Cable one of the NIC and PING the Destination Server. We will get Reply from the Destination Server.
10


Installing SharePoint 2007 Part-2

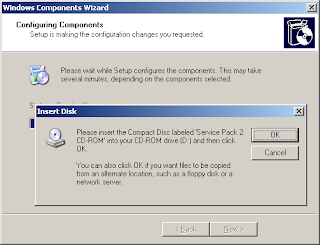
Now, launch the installation.  The Microsoft Office SharePoint Server 2007 dialog appears.


After a few moments you may see an error prompt appear.


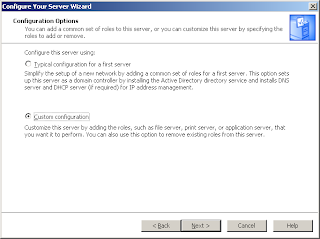
When you then go to IIS Manager and attempt to make the configuration as directed you may not see the ASP.NET v2.0 item listed at all. 


This problem may occur when installing IIS after installing .NET packages.  This problem is easily resolved.  Open a command prompt and then navigate to the .NET 2.0 directory.  This will be: C:\WINDOWS\Microsoft.NET\Framework\v2.0.50727.  Enter the following command:
aspnet_regiis -i
This will take only a few moments


After it completes return to IIS Manager and verify that the ASP.NET v2.0 item is listed.  By default running this command also sets the status to Allow.


Relaunch the SharePoint 2007 installation.  The Microsoft Office SharePoint Server 2007 dialog appears.


After a few moments the Enter your Product Key page appears.


Enter your product key and then click Continue.  The License Terms page appears.


Check the acceptance option and then click Continue.  The 
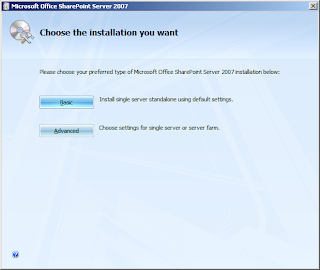
Choose the installation you want page appears.


Click the Advanced button.  The Server Type configuration page appears.


Select the Complete option; and select where you want the application and data files stored and then click Install Now.  An installation progress meter appears.


Depending on your system this approximately 5 minutes.  On completion you will be prompted to launch the SharePoint Products and Technologies wizard.


This completes installation tasks.  Next you will perform configuration.

Phase 3: Configuration of SharePoint 2007 (30 minutes)

The Configuration Wizard can be run at any time post installation.  For this procedure we'll proceed directly into configuration.  Make sure the option to launch the configuration wizard has been selected and then click Close.  The Microsoft Office SharePoint Server 2007 installation wizard closes and for a few moments nothing will seem to happen.  A few moments later the SharePoint Products and Technologies Configuration Wizard dialog appears.


Click Next.  A warning prompt appears.


CLick Yes.  The warning prompt closes and the Connect to a server farm page appears.


For a first-time installation select the No I want to create a new server farm option and then click Next


The SQL Server instance is located at: 2003K1\SQLEXPRESS.  For the purposes of this procedure, I created a domain user specifically for this SharePoint instance, corp\spservice.


Click Next.  The Configure SharePoint Central Administration Web Application page appears.


Select a specific port or accept the default, and then click Next.


Click Next again.  This launches the configuration wizard.


Configuration last approximately 5-10 minutes.  When it is completed the Configuration Successful page appears.


This completes installation and configuration of SharePoint 2007 on Windows Server 2003 R2 Enterprise.  For the last and final step, let's test the installation just to be sure that things work.

Step 4: Testing (5 minutes)

On the SharePoint Products and Technologies Configuration Wizard dialog click Finish.  The dialog closes and then the default browser will open along with a login prompt. 


Enter your authentication details and then click OK.  You may experience an Internet Explorer warning. 


This results from having Internet Explorer Enhanced Security Configuration enabled.  Just click Add and then add the current URL to the list of trusted sites.  You will then be navigated to the SharePoint 2007 Central Administration page.


Congratulations!  This completes this procedure.
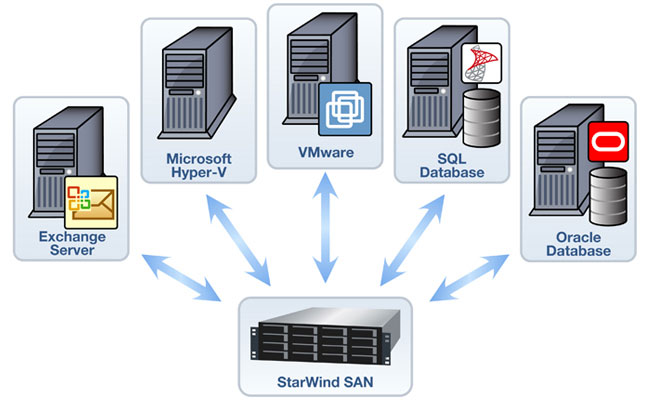
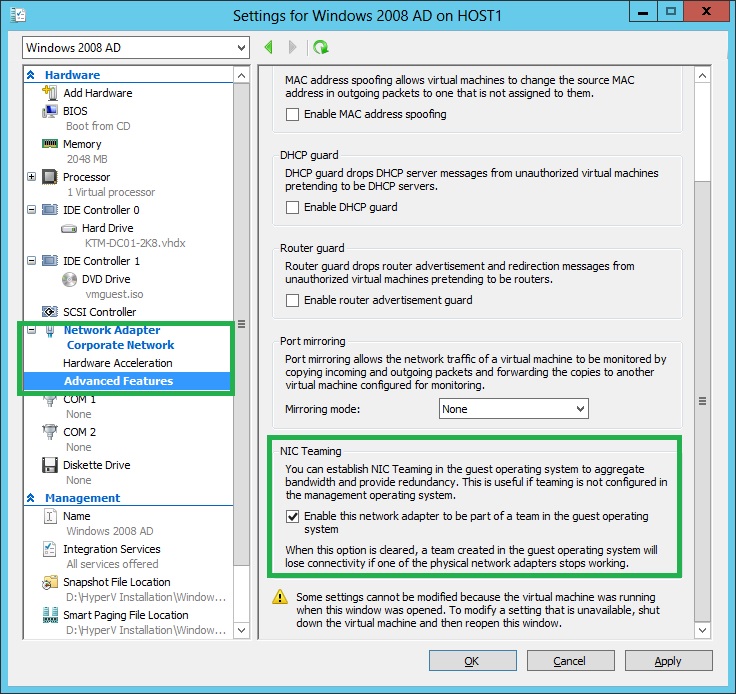
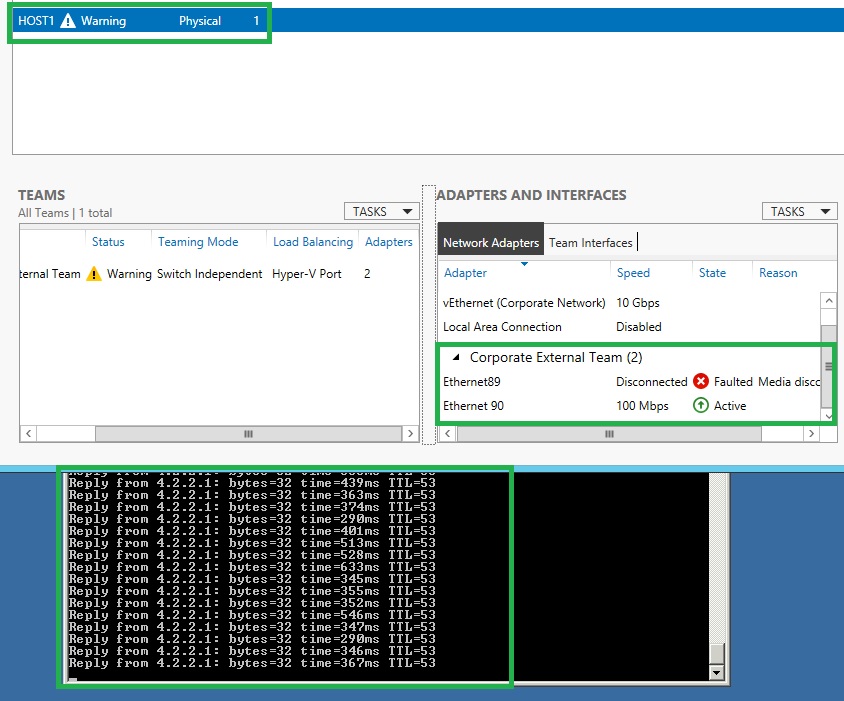
Installing SharePoint 2007 Part-1

Introduction

This procedure walks you through step-by-step installation of SharePoint Server 2007 Enterprise onto Windows Server 2003 Enterprise Edition SP2 in a small farm configuration, consisting of a single SharePoint 2007 server and single Microsoft SQL Server 2005  Express backend.  The SharePoint 2007 instance is deployed to an Active Directory domain based upon Windows Server 2003.  This procedure is performed using VMware Workstation 7.1.3.  The term "SharePoint 2007" referred to in this procedure includes both Microsoft Office SharePoint Server (MOSS) 2007 and Windows SharePoint Services (WSS) 3.0.  It assumes the pre-installation of the database.  The SharePoint 2007 installation proceeds in four main phases: 1) preparation of Windows Server 2003, 2)  installation of SharePoint 2007, 3) configuration of SharePoint 2007, and 4) testing.  You will need the Windows Server 2003 and SharePoint 2007 and associated service pack and patch installation media available in order to complete this procedure.  All references used in support of this procedure are listed below in the References section.  From start to finish complete default installation takes approximately 80 minutes.  Good Luck!

Procedure

Phase 1: Preparation of Windows Server 2003 (30 minutes)

On the Windows Server 2003 machine, click Start, and then click Manage Your Server.  The Manage Your Server dialog appears.


Click Add or remove a role.  The Configure Your Server Wizard dialog appears.


Click Next. A wait notice appears for a few moments.


And then the Configure Options page appears.


Select Custom configuration, and then click Next.  The Server Role page appears.


Select the Application server (IIS, ASP.NET) role, and then click Next.  The Application Server Options page appears.


Check the Enable ASP.NET option, and then click Next.  The Summary of Selections page appears.


Click Next.  The Applying Selections page appears, displaying a wait notice.


During role installation and configuration you may be prompted to insert the Windows Server 2003 disk 2 of 2 and the Windows Server 2003 Service Pack 2 disk.
  • TIP: If you are using a Windows Server 2003 Server media that includes SP2, insert Windows Server 2003 disk 1 of 2 instead of the Service Pack 2 disk.

After installation and configuration of the Application Server role is completed the This Server is Now an Application server page appears.


This completes Phase 1 of SharePoint 2007 installation.  After the Application Role installation and configuration is completed, perform a Windows Update.  Now that the Windows Server 2003 machine has additional software installed, there may be additional security and other updates that apply. 

Phase 2: Installation of SharePoint 2007 (15 minutes)

Before beginning the installation, be sure to setup the appropriate SharePoint service accounts and to also verify database availability.  For the purposes of this procedure, I have setup a single domain account, sp2007Farm, that I will use for all initial account configurations.  These can be changed later as desired.  Also, verify that the SQL Server Browser service is started on the database host:

If it isn't started, the Products and Technologies Configuration Wizard will be unable to connect to the SQL server instance, and you may experience this error during configuration:


To avoid seeing this error, verify that the service is started and set to automatic.