
The Secure Sockets Layer (SSL) is a commonly-used protocol for managing the security of a message transmission on the Internet. SSL has recently been succeeded by Transport Layer Security (TLS), which is based on SSL. SSL uses a program layer located between the Internet's Hypertext Transfer Protocol (HTTP) and Transport Control Protocol (TCP) layers. SSL is included as part of both the Microsoft and Netscape browsers and most Web server products. Developed by Netscape, SSL also gained the support of Microsoft and other Internet client/server developers as well and became the de facto standard until evolving into Transport Layer Security. The "sockets" part of the term refers to the sockets method of passing data back and forth between a client and a server program in a network or between program layers in the same computer. SSL uses the public-and-private key encryption system from RSA, which also includes the use of a digital certificate.
TLS and SSL are an integral part of most Web browsers (clients) and Web servers. If a Web site is on a server that supports SSL, SSL can be enabled and specific Web pages can be identified as requiring SSL access. Any Web server can be enabled by using Netscape's SSLRef program library which can be downloaded for noncommercial use or licensed for commercial use.
TLS and SSL are not interoperable. However, a message sent with TLS can be handled by a client that handles SSL but not TLS.
Create Self-Signed SSL Certificate
- Log into the web server by using the SharePoint Set up account.
- Open IIS Manager. Click on the IIS Server and then double click Server Certificates.
- Click Create Self-Signed Certificate link as shown in the figure below:

- Enter the name of the SSL certificate that you want to associate with the central administration web site.
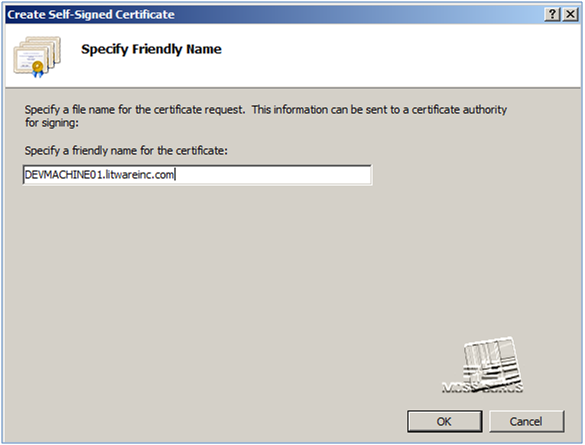
- SSL certificate is created.
Bind Self-Signed SSL Certificate with the Central Administration Web Site
- Right-click Central Administration web site. On the context menu, click Edit Bindings.
- A windows dialogue box will appear.

- Click Add to create a new binding for central administration web site.
- On the Add Site Binding window, select https from the Type dropdown and select SSL certificate from SSL certificate dropdown. Click OK to save changes.

- Click Remove button to remove default http binding as shown in the figure below:

- Now we have only https binding left for the central administration web site.

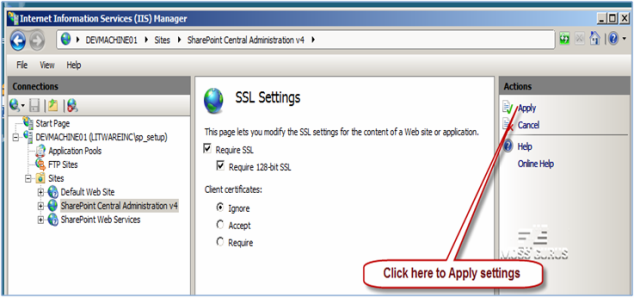
Update SSL Settings for the Central Administration Web Site
- Select SharePoint Central Administration v4. Double-click SSL Settings to open SSL Settings page.

- Configure the following options and click Apply to save settings.
- Require SSL (checked)
- Require 128-bit SSL (checked)
- Client certificate: Ignore (selected)
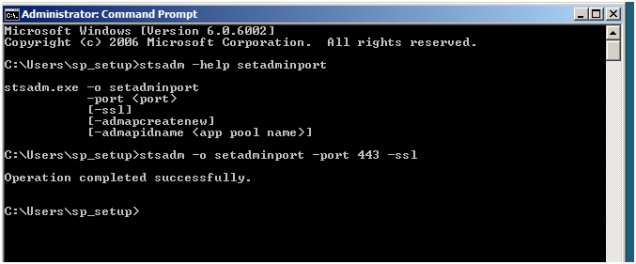
Execute STSADM Command to Update Registry Settings on the SharePoint Farm
- Open command prompt and execute the following statement:
STSADM -o setadminport -port 443 -ssl
- Now open SharePoint Central Administration Website.
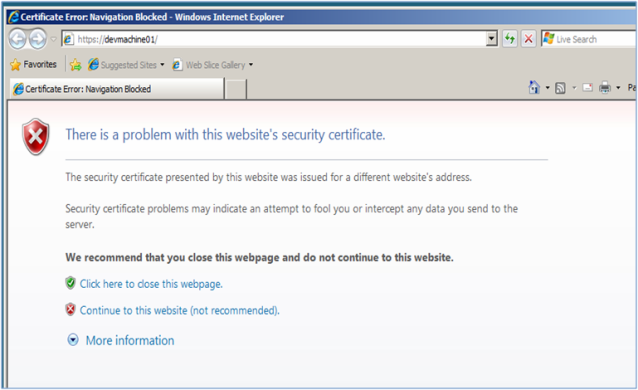
- As you see in the screenshot above, Internet Explorer is showing SSL
certificate error. Now to browse to alternate access mapping page and
specify fully qualified domain name for the central administration web
site. i.e.
ServerName.DomainName. Once the alternate access mapping settings are updated, close your browser and open the central administration web site again.


0 comments:
Post a Comment